Wednesday, July 31, 2013

Relic character art 3

This guy is a little more of a traditional archetype, a crusader or paladin style warrior, complete with multiple weapons and elaborate, heavy armor. The little ornate details are what make this kind of character fun to draw.
 

Tuesday, July 30, 2013

Relic Character art 2

This is another one from the Merchant kingdoms, this time a featuring a magic user from a fairly unusual character race that is unique to the setting in my experience with RPG's. She may not look any different from a human sorceress here, but lets say the differences become more distinct when you see her in color.

Monday, July 29, 2013

Relic Character art1

This was one of the character archetypes I made for Savage Mojo's Relic fantasy setting, specifically the source book centered around the merchant kingdoms, which have an Arabic flavour.
 
This was designed to be the archetype fighter, a soldier, mercenary, or guardsman.

Saturday, July 27, 2013

Cardback sketches from Comic Con

 
As many of you are no doubt aware, doing art for Magic the Gathering has a few perks. Among those, are the 50 copies of the "Whiteback" comps that Wizards sends to the contributing artists of the game. Every card we create, we essentially receive 50 copies of a non playable, very limited, very small print of the image. And while I have never sold them before now, I have finally decided to break out my supply of whitebacks and start bringing them with me to conventions.
 
Seen here is a sampling (about half) of the card sketches I brought to Comic Con in San Diego this year.
 

Friday, July 26, 2013

Gozaru No Oni

This image had a wonderful description for me to work from. It was simply that it needed to be an enormous creature, and a cross between a centipede and a sandworm, but the art director made sure to mention that I could take it in a different direction if I was inspired, and that it simply needed to be as big as possible, scary, and breaking through a giant wall. The "codename" given to the creature during development was "Godzilla", which I thought was great. I spent several days designing different kinds of bodies and heads, some with alien limbs and spikes, some closer to a giant mutated serpent, and some that were more insect then wyrm. But in the end I picked the pieces that worked best, and combined everything together into the image as it looks in the submitted sketch.


Here it is after I cut out the main figure and the wall, and started with the basic shading of the overall scene, the serpent body, and was actually pretty far along with the detail work for the head. I knew it was going to be the trickiest part of the image, so I went in and tackled it first.

This is where I pulled back the contrast of the wall and darkened it down a bit. I needed it to show depth behind the monsters head, and still have smoke and debris blowing around it at the same time, So I played with the tone until it gave me what I needed. I had also begun to color the monster as well.
 
 
 Here I've added back the shading to the wall, and created crack details and further defined the flying rocks. I also added in the final colors for the creatures eyes and mouth, and added the birds in the background for additional size reference and interest in that side of the image. I initially wanted to put mountains in the background, and planned to as seen in the approved sketch, but realized half way through that it kind of ruined the upward angle shot, and almost made the creature seem smaller, so I took them out and replaced them with birds.


Here I've refined a bit more of the lighting, worked in the body details, the wall texture, and nearly finalized the overall scene color concept.


Here I've added some light coloring to the sky to help contrast the creature from the background, and added in even more texture, including an overall scene texture overlay to add more action and visual noise to the image.


Here I've flattened it down, and darkened it a bit, and really played around with the colors, glows, depth of field, and contrast. Sometimes with an image like this, a monochromatic palette can lend realism, but then adding just enough color to give it impact can be a fine line, so I usually wait until the latter stages of an image to really play with the color theory.

Wednesday, July 24, 2013

Spirit of the Burning Sky

This image was done for the card game "Warlord" and was actually very fast from design to completion. It took about 4 hours.
One of the reasons it was so fast to design, was that it was a new version of a monster that I had designed for the game previously, called a "Stormwraith", and the original design had been so popular, that I had been asked to do more of them in each set, until it was simply an easy subject for me to work with. The Spirit of the Burning Sky was simply the same kind of character, but using fire instead of electricity.
This first image is the sketch as submitted to the client.


After approval, I started rendering in the lights and shadows, cut out the main figure, and began to do a little bit of the edging details as well.
 
Here I added even more shadows, and darkened up the overall character to create a very silhouetted look. I also knew he was going to be surrounded by fire, so I started adding in the basic shapes for dark smoke behind him, to give the fire contrast and maintain depth.


 Here I added in the fire effects, and some basic color for the background.
 
And here is the final, with textures, another layer of color adjustment to darken things down a bit more and bring out the orange and reds, glow effects and some sparks to add motion and little detail.


Tuesday, July 23, 2013

Doombringer

 This was a fun one, a job done for a large, particularly demanding card game company that shall remain nameless.
The original description was that the monster needed to be a giant, fire based, apocalypse monster. The shape size and details were all open season. So I provided the sketches shown here, and they picked the first one, as I suspected they probably would.


 After the initial sketch approvals, I sent in progressive shots for incremental approval, something I don't usually do, but it has the added benefit of saving out piece by piece images for me to show how the image came together. This is the color sketch, using just basic shading and coloring to create a rough for the images overall concept.
Here is the rough refined a bit more, with added coloring and texture to the background, to bring the figure out more, and with some rim lighting for a little dramatic contrast. I also reduced down the contrast of the fires along his back and neck area, so I could paint in the final fire over the top.

And here it is at final, with the background colors saturated even more for contrast (with fairly low color characters this is a trick that can add more color to the image without hurting the overall character concept or mood to much) And of course with the finished fire, molten cracks, glow effects, even more rim lighting, and just a whole lot of little refined detail work.

Monday, July 22, 2013

Dragon Doom


This was an Italian fantasy novel cover I worked on a years ago, and this is the original sketch as submitted to the client.


After doing some test layouts, the client asked for some changes due to the title and text placement that needed to go over the image. to accommodate, I moved the dragon into the center of the image, and shrunk him down just a little to create open space on the top, bottom, and sides.


Here I laid in a number of photo elements onto the background, following the perspective and lines of the sketch. I first turned the sketch to a multiply layer so I could orient the photo elements correctly, and not create any issues with the main figure.
I also added in some light airbrushing to indicate the lighting of the fires in the background before painting them in.


Here I cropped out most of the main figure, and lowered the contrast and color down to a mid-tone gray, in preparation for painting.


 Here I began painting in the highlights and shadows, really using rough brushwork and not zooming in on the image very far. I knew I wanted the dragon to be both dark and retain a sheen to its scales, so I concentrated on the shiny highlights first, exaggerating them with my lighting work. I also began painting in some of the foreground elements, and added some more shape to the flames.
 
 
I then duplicated the main figure layer and changed it to multiply, which automatically brought the tones way down, and closer to the darker look of the final color for the scales.


 This is where I started zooming in and refining the details down, and is probably the most time consuming part of the image. I was also pulling back on the contrast on some of the highlights to emphasize the flame as the light source, and not confuse the image too much.
 
 
As I began adding color, I didn't worry too much about how it looked right away, just laying in the basic hues to get a sense for where the color shapes were going, and trying to balance out the scene. I also added some more work to the background, finishing up the flames, and adding a few light rays to the background to help pull out the main figure, which I knew was going to be a priority early on when I got the description for a dark creature in a dark, indoor environment.


And here it is after I added textures, glow highlights, and played with the color for another hour or two. In retrospect, I probably added a few too many glow effects to the silhouette, but I was really having fun making the fins and wings look transparent, and wanted the area lighting to push that bright backdrop a bit more and reinforce the effect.


Sunday, July 21, 2013

Demon Hunters Handbook Cover

I've been working with Paizo a very long time. One of my first big commissions as a working freelancer was a cover for Dungeon Magazine , and soon after Dragon Magazine as well. This was followed by many, many articles, pages spreads, borders, title graphics and interior maps for both magazines. Paizo was great to work with on those first projects, and they have been one of my most consistent clients ever since.
 
I've tried to contribute a good amount of art to the Pathfinder line since it began. They have always managed to maintain such a high standard of quality, that having my work included in their products is always an honor. But until recently, I had only done interior illustration work for Pathfinder, and never any covers. That all changed about four months ago, when they contacted me to do the Demon Hunters Handbook cover, an action scene featuring their iconic dwarf and a giant demon, a scene which hearkens back to the kind of art that used to grace the pages of old Dungeons & Dragons covers, and yes, even the pages of Dragon and Dungeon Magazines as well.


Here we have the submitted sketch, and the corresponding color rough produced prior to working on the final image.
 

The book should be on shelves early August, and is available for pre-order here

Saturday, July 20, 2013

Avatar of Slaughter creation process

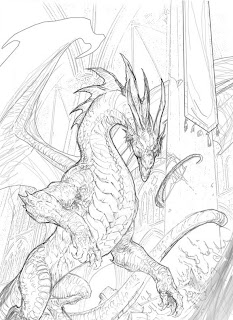
After sketch approval, I began to render in the values in grayscale, both on the character and background, to get a sense of the shapes the lighting was going to create in the composition.


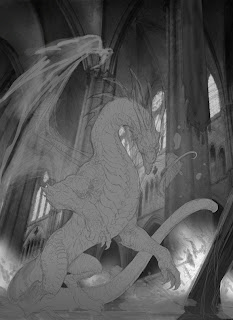
Then I started darkening the image down to a medium range of tone, and flattening some of the contrast with a low opacity airbrushing. I left just enough of the tones in place to pick out the general shadow areas, and used the airbrush to darken in some of those as well. 


I began adding a very light general color base to the image, which would give me something to build on, and a general sense of where to take the scene coloring later on. I also began picking out some of the detail shadows and highlights. 


I added a little more color and some of the glowing areas. I gave him a kind of bruised purple color, because I knew he was a red creature in the game, so I would end up washing the image in lots of reds and oranges, so the purple would darken up nicely later on. I also wanted to make sure I got enough of the darks down early, so he would have a very shadowed, silhouette kind of look, and the glowing areas were immediately important as well, as they were going to stand out against the dark shadow areas the strongest.


 Here I began to add the edging on the shadows and pull out the highlight, putting in the depth that would define the various details on the armor plates, headpiece and weapons. I also blocked in the armies bellow the figure. I started adding a few details to the background as well, giving the mountains some rim lighting, and adding back the vultures from the initial sketch.
 
 
 I rendered in even more of the background here, giving it texture and adding in mist and clouds for additional distance and interest. I also gave it a light wash of cyan, because I knew it would drop out behind the heavy reds and blacks I was going to be using on the main figure, and give additional depth. I also added in some of the coloring to the glowing areas, and continued to add definition to the shadows and highlights. I also began texturing the figure here.


Here is where I really started to pull out the glowing areas, in the face and weapons, adding the full color effects. I was continuing to refine the little details of the armor and weapons here as well. I also painted in the armies in the foreground, which was an interesting balancing act. Usually when painting something into the foreground as a secondary element of interest, I will use fairly little detail so the eye just glides past it to the main figure, but here, detail was necessary to pick out all the small figures, so I had to resort to color use and tone. I kept the coloring bland and used the clouds of dust stirred up by the dual armies to keep them both as close in tone to the background as possible. This kept them from becoming the primary interest, and guaranteed that the eye would only see them once it began to travel over the background elements.


I began to really tighten everything up here, adding in even more textures and glow effects, putting in more reds and browns to the foreground and the main character. It was a tricky decision to add just enough red to the right areas, as I wanted to leave enough of the armor in the dark gray range to suggest the kind of ancient, dented, spiky, imposing, evil looking armor a war god would want to pull off the clearance rack.
 
 
And here is the final, with a little more texture thrown on top for good measure, and a lot more orange added into the image as a whole, which I mainly added in after flattening the image down to a single layer. This helps pull out the existing reds, and saturates them even more, while pulling the rest of the image ever so slightly into the same warm range, which help pull the details together, and helps them "sit" in the same image more believably. 

Friday, July 19, 2013

Polluted Dead

This is the original sketch as submitted to the client. I added in a lot of background shading and some texture, because I knew the image was going to be heavily silhouetted, and I wanted to show a lot of detail and lighting to fully show the concept. Sometimes when you know a sketch is almost certainly going to get approved, it doesn't hurt to take it a little further towards completion then is ordinarily wise.


Here I have cut out the basic elements and started rendering the shadows and highlights. I have left the green goo completely flat, as I intend to render it separately from everything else.


I have started to add in the basic color, separating out his clothing and rags from his skin and bones. I've also begun adding basic definition and shading to the background.


 Here I've begun putting in more color, refining the details, and adding a little texture. I've also begun to darken the tones in the background and add mist for atmosphere and the help bring foreward the main figure.


Here I'm starting to add more of the scenes final coloring, putting in even more texture, and finalizing some of the little details.


And here I took another pass at the scenes overall color scheme, darkening it down even more, and adding a slight burgundy tint to the clothing to help separate the character from the cyan and green background. I also brought up the saturation on the green sludge in the background and at his feet, to really focus on the "pollution" concept.

Thursday, July 18, 2013

The Final Confrontation

This was a full page image done for Dungeon Magazine. It features a Fomorian king taking on a female Eladrin knight in front of the high walls of his underground city. It was a challenging composition, any time you have to feature two characters facing off with one another, and one of them is 20 feet high (A challenge that is pretty common in D&D art actually) and I had to show them in a compact area!
My favorite solution for this kind of scene is a little layering and distance to show the difference in size and include both characters in the frame equally. I could have just put all the focus on the Eladrin, and just shown the Fomorian from the knees down, but that wouldn't have accomplished the goal, or been very action packed, so it became more about creating depth of field.
 
After a number of composition experiments, this is the initial sketch that I turned in, which was approved with one change, they felt the Fomorian wasn't quite ugly enough.


 They wanted more of the bulging eye, mutant kind of look I had done for the Fomorians in the Monster Manual for fourth edition D&D. So I obliged with a follow up sketch, seen above.


 The sketch was then approved, and I proceeded to airbrush in some greys to lighten the line work, define some of the highlights, cut out and shaded some of the armor and straps, and dropped in the base texture for the fomorians chain mail. I also started rendering the rim lighting on the Eladrin, and defined some of the shadows as well.


 Here I am already just about finished on the Eladrin, having used much of the original sketch to create detail line work on the armor, and just brushed in additional shading and strengthened all the highlights and defined the edges.
For the Fomorian I was chopping out and filling the armor and main torso with their base tones before I started to render the bulk of the figure.


 Here I was starting the add in the background detail, texture and coloring, as well as dropping in color on the Eladrin. I was just about done with the Fomorians multiple articulated armor plates and little bits of gear, and was laying in a little color in his different items and a light skin tone on the face as I worked in the little face details.


 Here I finished coloring the Eladrin, and at this point she was pretty much complete. The Fomorian was also done with the basic rendering, and I had finished with the base coloring, and even done another pass of highlights and shadow work (this is usually necessary once I've added in all the colors, as some hues inevitably shift a little with color and need adjustment), as well as adding in the rim lighting


 Here I have started to really finalize the coloring of both the scene and the characters. I also darkened in some areas around the left side of the image, to add contrast to the main scene, and lightened the background around the Fomorian and Eladrin both to pull them out of the image more. I also reduced the contrast of the ground to make it blend into the background.


Here I added a lot more contrast, the final highlights and light blooms off the reflective surfaces, and pulled up the saturation on the cyan, blues and yellows, while leaving the Fomorians skin tone unchanged, which helped mitigate the almost cartoonish purple color of the creatures skin and created the illusion of lower saturation by contrasting and surrounding it with complimentary, and equally saturated colors. I also dropped in a lot of scene texture and grit to add some noise, movement, and implied wear and tear. And its done!